802.1X protocol is a great way of securing Wi-Fi networks, especially those still using the WPA2 mechanism. There are 3 main components in 802.1X networks: supplicant (the device that will be authenticated in the network, using one of many authentication methods), authenticator (network device that provides access to the network and maintains session algorithms), and authentication server (usually RADIUS server who negotiate authentication method, check supplicant credentials and grant or reject access to the network).
This article will focus on a RADIUS server configuration built on open-source FreeRADIUS software and an authenticator configuration based on an ExtremeCloud IQ (XIQ) cloud controller.
The main goal of this description is to describe the easiest way of deploying an 802.1X network in the Extreme Networks cloud environment, using low-cost components when possible, based on current vendor licensing policy.
FreeRADIUS configuration
Many articles and videos describe how to install FreeRADIUS. The best part is that it can be installed on a really compact and cheap piece of Linux-supporting hardware, like NanoPi NEO.
Links to a video about FreeRADIUS installation and initial configuration:
- Clear To Send, episode 248: https://www.youtube.com/watch?v=5i2s2MjySC8
- CWNE88: https://www.youtube.com/watch?v=8MVWrCgaH68
To prepare FreeRADIUS to send back three standard RADIUS Attribute Value Pairs in the Access-Accept message, users file needs to be configured like below examples. Here are two users (marian, ferdek) with attributes required by ExtremeCloud IQ (XIQ) and VLAN IDs assigned (those need to be integer from 1 to 4095). VLAN ID examples are 10 and 20, they will be configured also on the controller side.
Edit the users file: sudo nano /etc/freeradius/3.0/users

A very important step is to modify /etc/freeradius/3.0/sites-enabled/default file. By default, FreeRADIUS sends tunnel attributes during tunnel negotiation frames, which is not acceptable by XIQ, which expects those attributes in the Access-Accept message. The troubleshooting process will be described in a separate article, here is just the solution for that behavior.
Modify /etc/freeradius/3.0/sites-enabled/default file moving the “files” section before the „eap” section in the „authorize” module. By default, “files” are just after “eap”:
sudo nano /etc/freeradius/3.0/sites-enabled/default

This change may impact other vendor configurations, but it will not work with Extreme otherwise.
In addition, it is highly recommended to disable the EAP-MD5 type of authentication, because it is not secure and it was never meant to be used in production networks. CTS video shows how to change the default type of authentication from MD5 to PEAP, but to disable EAP-MD5 authentication in FreeRADIUS, open the eap configuration file:
sudo nano /etc/freeradius/3.0/mods-enabled/eap
Locate the EAP-MD5 section and either delete or comment out the lines with the # sign:

Save the changes and close the editor, restart the FreeRADIUS service to apply the changes:
sudo systemctl restart freeradius
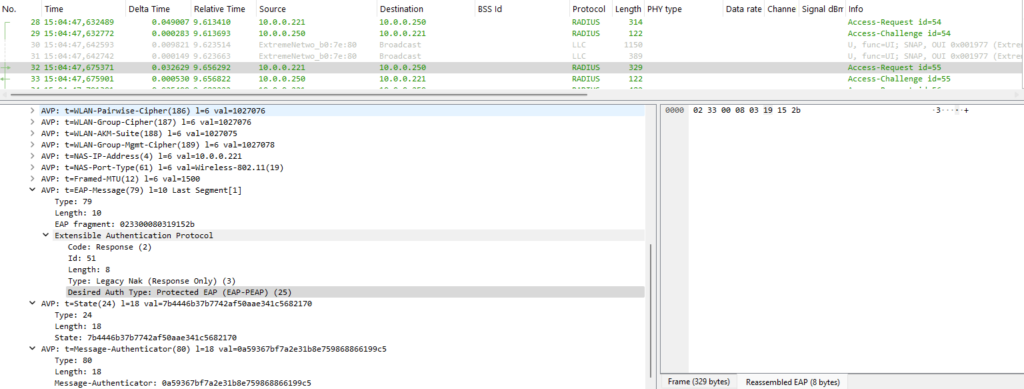
After completing these steps, FreeRADIUS will no longer support EAP-MD5 authentication, however, it is „smart” enough to recommend other types of authentication even when MD5 is enabled – we can see that behavior in a frame exchange:
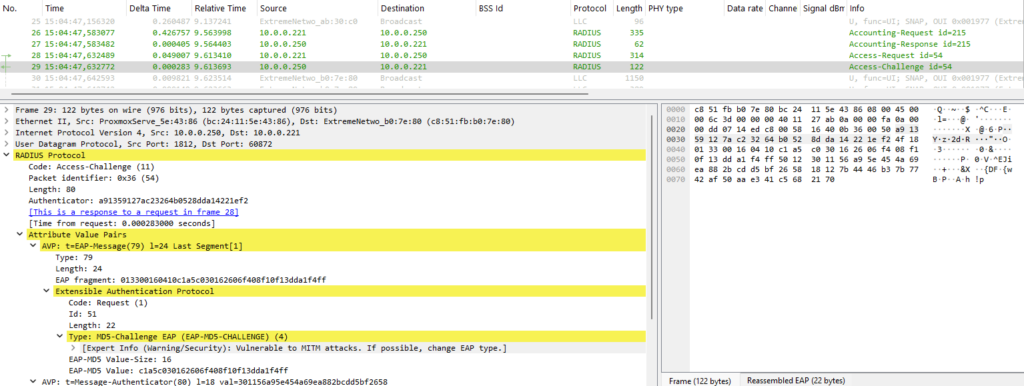
10.0.0.250 is the IP address of my FreeRADIUS server which replies to the authenticator (Extreme AP with IP address 10.0.0.221) that MD5 shouldn’t be used. As a result, we can see in the next frame reply from the authenticator – Legacy NAK and that EAP-PEAP is the desired authentication method:
ExtremeCloud IQ configuration
When FreeRADIUS is configured and ready, it is time to configure the cloud controller. As of time of writing (September 2024) Extreme gives two possibilities to use their ExtremeCloudIQ (XIQ) for free. The first option is to set up a basic functionality account called Connect. It is limited to managing 10 devices and cannot assign different parameters based on classification rules. This type of account will not allow then dynamic VLAN assignment but will allow for static VLAN to SSID mapping using WPA2 or WPA3 Enterprise authentication utilizing Your FreeRADIUS.
The second option is to start a 90-day trial of a full functionality account called Pilot, which will allow for creating classification rules or use PPSK. This article will describe this second option since it will include also static VLAN to SSID mapping on the Connect type of account.
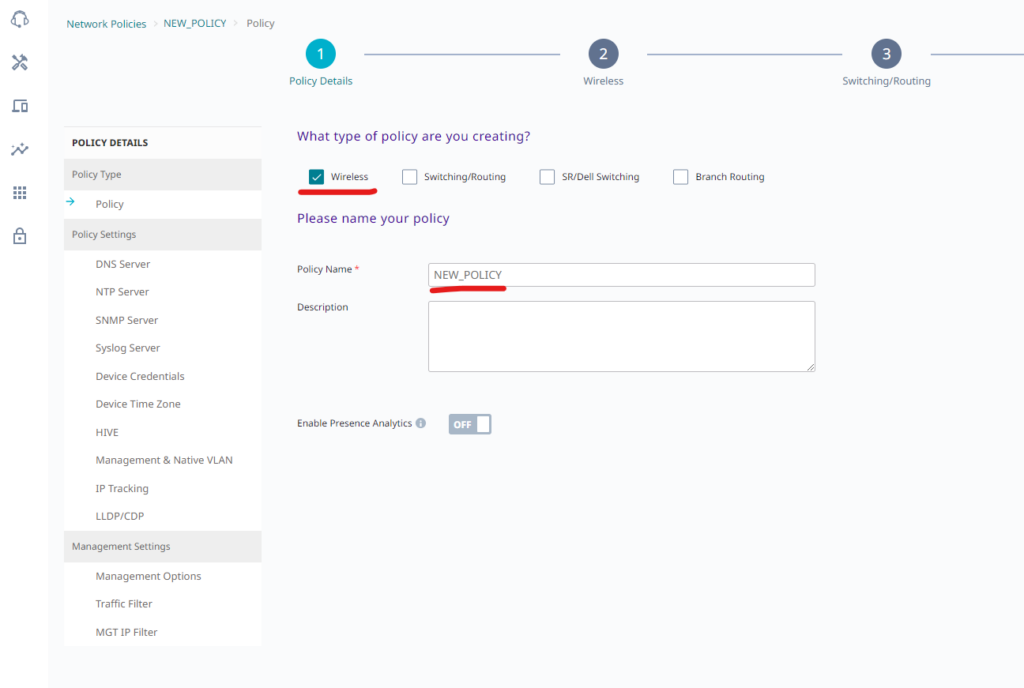
To start working with XIQ register at: www.extremecloudiq.com, after registration, during the first login choose to start a 90-day trial. Video about onboarding devices can be found here: https://www.youtube.com/watch?v=DSdSF11Fscw, then go to the menu on the left side – „Configure” -> „Network Policies” and click the „Add Network Policy” button. On the first page, there is the possibility to create a name for a policy and configure some management parameters like NTP server, Syslog, Management & Native VLAN. Here MGMT & Native will be default VLAN 1. There is a rollback mechanism if wrong parameters are applied to a device, which allow it to go back to the previous configuration if the device will cut off itself from the internet after changing VLAN and Management parameters. On this page, there can be only a Policy name configured, check only the wireless type of policy to make it simpler, and click Next at the bottom right.
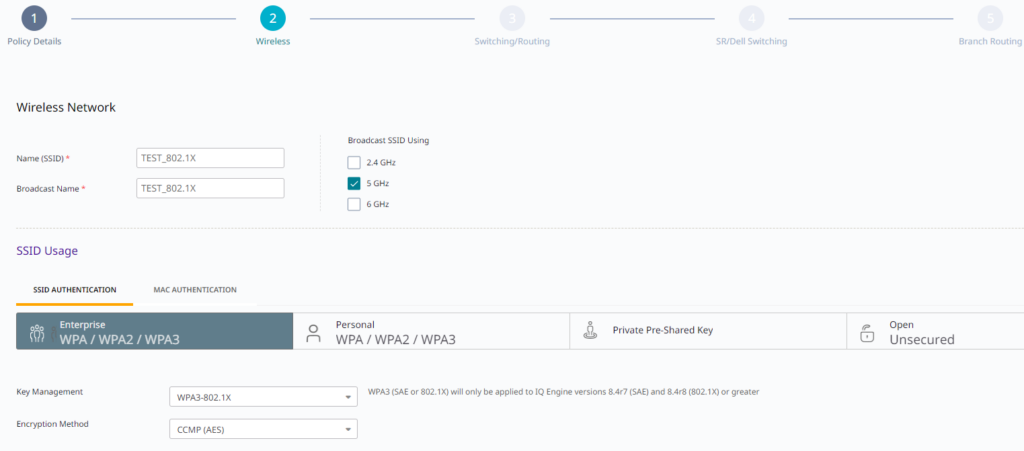
On the second page, there are two important things to configure: Wireless Networks and AP Template. Click “ + ” to add a new network, then name it and choose Enterprise type SSID Authentication with WPA3 or WPA2 Key Management:
It is time to add the RADIUS server. In the “Authenticate via RADIUS Server” section click the” + ” button, and a new window will open to create a RADIUS Group. There is a possibility to add multiple RADIUS servers in case one of them will be offline. On the right side of the name configuration, there is a gear icon – one of the options is to enable Change of Authorization (CoA) for this RADIUS Group. This feature is not needed when VLAN is assigned during association, so there is no need to check it. There can be four different types of servers added, but when using FreeRADIUS, an External RADIUS Server should be used. Configure name, create IP/Host Name object by clicking “ + ” and type shared secret created during FreeRADIUS configuration in a /etc/freeradius/3.0/clients.conf file. Authentication and Accounting ports should be default 1812 and 1813.
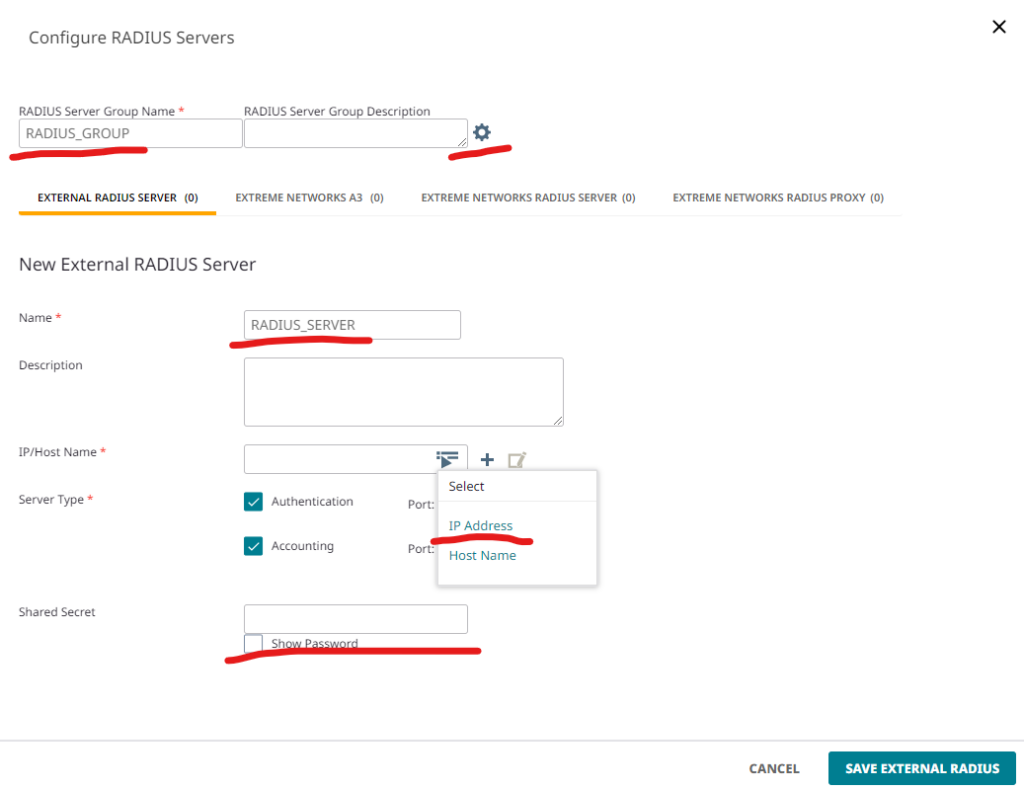
As a result, there should be a RADIUS Group created with the IP address of the FreeRADIUS server, check it, and Save RADIUS Group:

The next step is to configure User Access Settings. The default profile is the User settings applied to a user after authentication – especially this can be VLAN. This will be the only possibility to statically map VLAN to an SSID when a free Connect account is used. To change the Default User Profile just create a new one by clicking ” + ” on the right side. VLAN is another object that must be created and saved, it is used also for example during AP Ethernet port configuration.

For dynamic VLAN allocation scenario, Default User Profile will be used when RADIUS will not return any attribute in the Access-Accept message.
To configure dynamic VLAN allocation, there is an option to Apply a different user profile to various clients and user groups, check it. This article utilizes the possibility of sending back RADIUS attributes using three tunnel RADIUS attributes, but other options are available.

Using “ + ” creates as many User Profiles as needed, in this example, VLAN10 and VLAN20 user profiles will be used with the assignment rules based on RADIUS attributes:

To create assignment rules, click on ![]() the icon, then name it and choose the RADIUS attribute after clicking the “+” button:
the icon, then name it and choose the RADIUS attribute after clicking the “+” button:


The only value to be configured is „Tunnel-Private-Group-ID” which usually will match the VLAN ID. The rest of the parameters are also important because those values (10 and 1) must match attributes sent back by FreeRADIUS in the Access-Accept message.
The configured Rule looks like below, so save it and configure the Rule for VLAN20 the same way.

As a result, User Access Settings should look like below. To double-check assignment rules, please click on ![]() icon.
icon.

The wireless network is now configured, save it. Now there is a need to configure the AP profile, to allow traffic of all newly created VLANs. After saving, the Network Policy configuration flow should appear, so click on the AP template on the menu:

Click ” + ” to add a new profile (the default one can’t be modified) and filter out to find the used AP model:

In the profile, there are options to configure wireless and wired interfaces. The wired Interfaces configuration is located below Wireless and contains the Ethernet port configuration of the selected AP model. In this case, AP305CX is selected. Default settings for policy that include user-configured VLANs is Uplink Port Type, All configured VLANs are allowed and Native is VLAN 1. These settings will be sufficient for the presented configuration, if there is a need to change them, a new Port Type needs to be configured with the desired parameters:

After saving the profile, Network Policy is ready to be deployed, so click Next to step 6:

Apply the network policy to selected devices by checking them and clicking the Upload button on the right-down corner. Delta configuration update will update only changes made since the last update and Complete Configuration Update will upload the whole configuration and reboot the AP.

To test the results, check FreeRADIUS availability and attributes being sent by going to RADIUS Test built-in XIQ:

On a test page, enter the FreeRADIUS IP Address and user credentials. As a result, there should be a message that the server is reachable and the User-Attribute ID contains the desired VLAN ID for that user.

After association, the User Profile can be verified by accessing ML Insights -> Client 360 view. Here user marian is associated with the SSID TEST_802.1X and gets User Profile VLAN10 according to attributes provided by the FreeRADIUS server.


Thanks for reading!

